Saturday, October 31, 2009

Homemade Pizza Again!!!

Pizza1

Hohoho~ I bake PIZZA for brunch (breakfast + lunch). Friday and Saturday are school holidays for those who stay in Alor Star and Perlis state. Normally, we (my kids + me) will wake up late and skipped our breakfast on that day. I wake up around 9am, not too late actually and got my laundry done and clean my house. Since it has been quite sometime that we last eat PIZZA and I decided to bake PIZZA for our brunch. I don't have to ask my kids about this as they sure LOVE IT!!

This time round I bake the pizza crust using just plain flour and wholemeal flour. Surprisingly, it turn out very yummy. I make two 10" pan pizza with sausage, mushrooms & canned pineapple as its topping (*sound boring right??, but these are my kid's favourite). I sprinkles it with a lot of parmesan & mozarella cheese. I LOVE CHEESE!!

My newly bought pizza cutter. Very convinient when cut the hot pizza.

Pizza Dough: Makes enough for two 10" pizza

250gm plain flour
50gm wholemeal flour
2 1/2 tsp instant yeast
1 tbsp sugar
1 tsp salt
200gm warm milk (110f/43c)
80gm warm water (110f/43c)
3 tbsp olive oil/corn oil


Method:

Mix plain flour, wholemeat flour and yeast in a bowl. Add in sugar, salt and set aside.

In another smaller bowl mix milk, water and olive oil.

Pour it to the flour mixture slowly bit by bit and stir till it's well combined. The dough will be sticky at this time.

In a flat surface, dust your hand with some flour and slightly knead the dough for 2-3 minutes until it can forms a ball.

Place the dough in a greased bowl, cover it with cling film and let it rest for 20 minutes.

Remove the cling cover from the dough and punch the dough down so it deflates a bit.

Split the dough into 2 and roll it to the 10" round piece.

Let the dough rest for 5 mins and brush it with some olive oil before we top it with topping.


**You can refer to my previous
PIZZA post for the topping idea. We can actually top it with any of our favourite toppings - onions, tomatoes, tuna fish, prawns, bacon, ham, etc... The sauce for pizza also plays the important roles in PIZZA making, make sure you get the right and yummy sauce and don't forget to add a lot of cheese on it.


HAPPY BAKING!!

AMY

Wednesday, October 28, 2009

Zebra Cake - “斑马蛋糕”

Zebra Cake1


Zebra Cake??? Well, of course it's not a cake that using ingredients from any part of Zebra. It's just the pattern that resembled Zebra and end up we called it a Zebra Cake. This cake are soft and spongy. Not too oily and not too dry, it's just nice. It taste particularly like the normal sponge cake we can get out there, nothing special. The only thing that make it so unique is it's Zebra pattern on it, very beautiful pattern !!

This cake is not too hard to bake as well. The only thing that we need to look at it is the oven temperature. The cake tend to brown very fast at the top part and I have to adjust - on and off the top heat several time to ensure my cake are not burnt on the top. Actually I have bake this cake 3 times already with different recipes provided by others. But, I still love the one shared by Jo's Deli & Bakery one the most. The texture of the cake are very light and soft. Like I said, it taste just nice not too moist or dry and it's not too sweet as well. If you are free and never tried this cake before, go ahead and give it a TRY!!

Zebra Cake5

seperate the equal portion of chocolate batter and plain batter in 2 different bowl

Zebra Cake4

this is how the first four scoops of batter in the cake pan looks like

Zebra Cake 3

finished all the batter and it's ready to be baked in the preheated oven now!!

Zebra Cake2


ZEBRA CAKE RECIPE
(recipe adapted from Jo's Deli & Bakery)
INGREDIENTS:
Makes one 8" round cake

6 small eggs
110g castor sugar
150g cake flour (I use self-raising flour & omit the baking powder)
½ tsp baking powder
½ tbsp emulsifier (I use Ovalett)
100g butter, melted
30g condensed milk
1 tsp vanilla essence (optional)

2 tsp cocoa powder
3-4 tbsp water
1 tsp chocolate emulco (I use chocolate paste)
Dissolve cocoa powder and chocolate emulco in water.

Almond nibs or flakes for sprinkling (I omit this, my kids don't like cakes with nuts on it)

METHOD:

Preheat oven at 170c. Prepare and grease a 8 inch round cake pan.
Sift flour and baking powder. Set aside.
Beat eggs, flour mixture, castor sugar and emulsifier (ovalett) on high speed for 10 minutes* or until batter turns light and creamy, i.e. thick ribbon state. **To test, lift beater. Batter drops from beater should disappear when you count from 1 to 10.
Pour in melted butter, condensed milk and vanilla essence (if any). Mix at slow speed.
Divide batter into 2 equal portions. Fold in chocolate solution into one of the batter.
Using small soup ladle (original recipe from Jo's used spoon, I tried it with spoon before and it failed to produce a nice pattern lines on the cake) Scoop 3 of uncoloured batter into center of the greased cake pan. Then, scoop 3 of chocolate batter onto the center of the plain batter you just scooped into the pan.
Repeat until you have finished about half of the batter. Reduce to 2 scoops each now and continue layering. Reduce the amount of batter gradually until you only pour 1 scoop of each batter finally. The circles become smaller and smaller as your pour (Pic. 4).
Sprinkle almond nibs or flakes to cake. Bake at 170c for 35-40 minutes or until the skewer insert comes out clean.
Let cake in pan for 10 minutes before turning it on to a wire rack to cool complete before we cut and serve it.

p/s: I bake this cake at 160c and it takes me 40 mins to get the cake all cooked throughly. Different oven might need different temperature and time for baking a cake. Please take note**

HAPPY BAKING!!


AMY

Monday, October 26, 2009

Steamed Pumpkin Buns - “金瓜馒头”

Steamed Pumpkin Buns1

Most chinese today will take vegetarian food to celebrate 9 Emperors God. Some people they will take 9 days vegetarian food celebrating the big day. For me, as usual I will take 3 days of vegetarian food each year. Today is the last day of this 9 Emperors God Festival. I went to the temple to pray this morning with a friend of mine Ann-Ann. We go to breakfast together and back home I decided to make "金瓜馒头" Steamed Pumpkin Buns recipe shared by Ann-Ann for my teatime snack and supper. If there is extra left, I will keep it for breakfast tomorrow morning. For your information, this is my 2nd time making it. The first batch are all finished up by my kids before I could snap a pic..!!

I was so silly that I have done something wrong without realising it until the very last minute. I took out the pumpkin from my fridge cut out one big piece and straight I weight it according to the recipe 150gm (I hv forgotten to unskinned them before I weight it**). I washed, unskinned and cut it into smaller pieces, straight I put them into a small bowl and steamed it (I weight the pumpkin with it's skin on and after I unskinned and steamed it, the total weight of the smashed pumpkin is only 100gm - short of 50gm!!!) How??? The idea of adding more water to make up the weight just come into my mind, I added 30gm more water mixed with the smashed pumpkin, luckily it's only 30gm and not 50gm.

I can see the dough are too wet and very sticky...oh, is it because of the water I add?? and, I add some more flour after about 10 minutes of kneading...I know this time my pumpkin buns will not be as fluffy and soft as it use to be. Don't worry, the recipe I share here does produce soft and fluffy buns. But, make sure you don't repeat the mistakes I made here. Unskinned the pumpkin first before you weight it ~ lol!! Lesson learned**

Steamed Pumpkin Buns3

I was so lucky, the buns turn out not as fluffy as usual but it's still acceptable soft. I think it will be better proof if I left it longer before I steamed it. As I was in the rush to fetch my kids at school, I just leave the ready buns under the sun for 10mins. It's better if I can leave it under the sun for couple of minutes longer. I love the pumpkin aroma of the freshly steamed buns in my kitchen. It's smells so yummy, overall the buns turn out a little bit chewy (that's surely because of the mistakes I made) but to my surprise, it remain soft till now. The buns were steamed around 12 noon just now. Not too bad tho!!

Steamed Pumpkin Buns2

Recipe adapted from Ann-Ann's Blog 人生加油站

Ingredients

(A)
Instant Yeast (酵母) - 11gm
Sugar (糖) - 1 tsp
Warm Water (温水) - 150gm

(In a deep mixing bowl, mix all the ingredients above and let it proof for 10-15mins. Set aside)
先把材料A搅均匀,放置待发10分钟。(要用比较大的杯,以上的材料会由半杯胀发到一满杯)


(B)
Hong Kong Flour (包粉) - 500gm
Sugar (糖) - 8 tbsp
Oil (食油) - 8 tbsp
Salt (盐) - 1/4 tsp (少许)
Smashed Steamed Pumpkin (金瓜/南瓜蒸软成泥) - 150gm

Method:


Knead the ingredient (B) until it is mix together then pour in ingredient (A). Knead all the ingredients into a soft dough (20-30mins).
Let it rest for 10mins before divided the dough into 16-18 equal big portion. Roll the dough into a big trangular and roll it into spring roll shapes and lined it with 2"x5" patch paper. (I let it prove for another 10-15mins under the hot sun, covered the dough with cling wrap or wet cloth to prevent it from dries up while proofing)
Steam it in hot boiling steamer for 12-15mins.


AMY

Monday, October 19, 2009

Red Bean Swirl Bun

Red Bean Swirl Bun

I love everything with Red Bean. This time I try skill to make this Red Bean Swirl Buns. I use the homemade red bean paste I bought from a shop here. The bean paste sold by them are just great. It's not too sweet and without preservatives. I have to freeze it in my freezer and defrost it when I'm going to use it. By looking at my buns, I think I still need a lot of practice to shape the perfect looking buns.

Red Bean Swirl Bun3

Actually it's not that hard to make this swirl pattern. All we need is PRACTICE. The more we practice the better we'll become. Practice makes perfect right? Although the buns are not very pretty but it's soft and fluffy. It's like the one sold in bakery and remains soft for few days. Not too bad right? ^ ^

Red Bean Swirl Bun4

I made half of the dough into this Red Bean Swirl Buns and the other half I topped it with shredded Cheddar Cheese + Raw Sugar. Both buns are nice and yummy. Click HERE to see my Cheddar Cheese Buns.

Read Bean Swirl Bun2

Ingredients:

150ml Water + Egg (1 egg & add water until it's 150ml)
100ml Fresh Milk (I use Dutch Lady Full Cream Milk)
320gm High Protein Flour (Bread Flour)
80gm Plain Flour
90gm Castor Sugar
1 tsp Salt
2 tsp Instant Yeast
50gm Butter (softened)
Some roasted sesame seeds (for sprinkle on top)
Egg yolk + Milk (for brushing before baking)

Fillings:

Red Bean Paste

Please refer HERE for the method of kneading the dough.

To assemble the buns:

  • Weight 50gm dough balls. Roll it into 2"x5" rectangular shape.
  • Roll the bean paste into 1cm diameter long strip and place it at the center of the dough.
  • Fold the dough up and roll it again to flatten it.
  • Use a sharp knife and cut a long the dough 2 lines.
  • Lift up the dough and swirl it for few times before shape it round. Place the dough into paper liner.
  • Let the dough proof at warm place for 20-25 mins.
  • Brush the surface with the egg yolk + milk mixture before sprinkle it with some sesame seeds.
  • Bake in preheated oven at 180c for 12-15 mins or until it is brown in colour.

AMY

Cheese Topping Buns

Cheese Bun1

I use the same dough recipe for Red Bean Swirl Buns for this Cheddar Cheese Buns. Click HERE for the recipe.

Cheese Bun2

For topping we need:

Cheddar Cheese (shredded coarsely) + Raw Sugar

Brush the buns with egg yolk + milk mixture first before sprinkle the shredded cheese and sugar mixture on top.

AMY

Wednesday, October 14, 2009

Chocolate Rice Yoghurt Cupcake

Chocolate Rice Yoghurt Cupcake1

Each time when I go to the shop selling bakery ingredients, few stuff that I will check out are those super duper lovely cupcakes liners, different design of baking pan or cake moulds and the new recipe books. I just can't resist the cupcakes liner with various designs and colours. I will always check on their new arrivals. I have few different design in my collection now. What about you?? Do you like to collect it?

Chocolate Rice Yoghurt Cupcake2

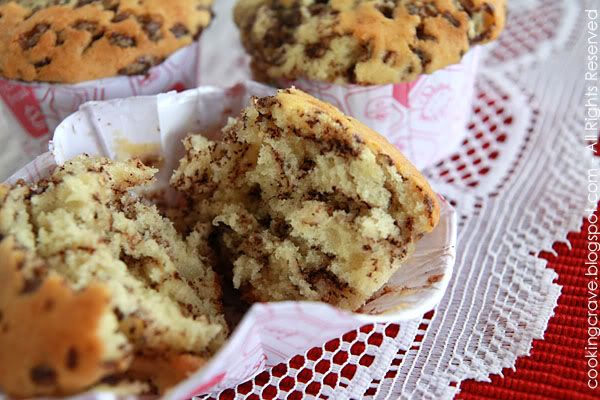
I came across this Chocolate Rice Yoghurt Cupcakes not too long ago in Happy Flour's Blog. After reading the ingredients used and it's method, I straight bookmarked it. I know my kids are gonna love this. They love cupcakes with chocolate chips or chocolate rice in it. From the picture in the blog, I can see how soft and fluffy the cupcakes can be. This is the cupcakes that I will want to bake for the kids. I don't like the chewy type muffins and this Chocolate Rice Yoghurt Cupcakes recipe are definitely a keeper. It's very delicious!!

Chocolate Rice Yoghurt Cupcake3

Recipe - adapted from Happy Flour

Ingredients needed:
40gm Butter
75gm Sugar
1/4tsp Salt
1 Egg
1/2tsp Vanilla Essence
110gm Cake Flour
1/2tsp Baking Powder
1/4tsp Baking Soda
110g Plain Yogurt
40g Chocolate Rice

Method:
1. Preheat oven to 175C.
2. Line muffin tin with paper liners and set aside.
2. Sift flour, baking soda and baking powder together, set aside.
3. Cream butter, salt and sugar until light and fluffy.
4. Slowly beat in egg and vanilla essence until well combined.(If batter curdle add in some flour)
5. Fold in flour and yogurt alternately until well combined.
6. Lastly fold in chocolate rice.
7. Spoon batter into the muffin tin until 70% full.
8. Bake in the preheated oven for 25-30mins.
9. Remove cupcakes from tin and cool on a wire rack.

Chocolate Rice Yoghurt Cupcake4

This cupcakes are moist, soft & fluffy ... very tasty.

p/s: I doubled the recipes and get 12 medium size cupcakes. Don't fill the cup too full to avoid the batter from spill out in the middle of baking time. Lesson learned*** I'm greedy and fill my cup too full and the cupcakes appears flat on the top, some batter spill out from the side of the cup**

AMY

Tuesday, October 13, 2009

Peanut Paste Bun

Peanut Buns

This time I use Wendy's basic sweet buns recipe for making this batch of peanut paste buns. I filled it with the ready made peanut paste I bought from the shop. Anyhow, you can just replace the peanut paste with read bean, lotus or pandan kaya fillings... it's really up to our own preference. To make the buns look more attractive for photography, I decorate it with some almond slices on top of it.

Peanut Buns4

As a full time housewife, I have to fetch my kids at the time and I just left the ready to bake buns to proof longer before I put them to bake in the oven. It was slightly over proof for another 40-45 mins... The buns however turn out great. It fully proof, doubled it size when I bake them in the oven. It's soft but I found it's skin are a bit hard (I still couldn't get the right setting for my oven *or the oven is too warm and I should switch off the top heat and on it back after the first 8 minutes of baking time)
I give some buns to a friend of mine and she told me the texture of the buns is a bit chewy (only a little bit ok!, I must have done something wrong???) However, for me I found it satisfactory for a newbie like me. I can assure all of you it's not because of Wendy's recipe but, I still have to improve my skill in making buns. Learn the correct way to knead, proof, shape and how to correctly baked buns in the oven. All that are very important in order to get the right texture and yummy buns. For the coming post, I'm sure I will bored you all with many different types of buns again... so, be prepared ya!!!! lol~~~

Peanut Buns2

Look at the texture of the buns... it's really fluffy, moist and soft!!

Peanut Buns3

Recipe adapted from Wendy's Blog
- The Adventures Of Giggles


7gm Instant Yeast
480gm Bread Flour
120gm Cake Flour
110gm Sugar
10gm Salt
25gm Milk Powder
300ml Water
1 Egg
60 Unsalted Butter (softened)

*Mix some egg yolk and milk to brush the surface before place in the oven
*Some butter to brush on the surface after remove the buns from the oven

Method :(If you don't have bread maker, please refer to - Bacon Onion Roll for the hand mixing and kneading steps).

1. Place the liquid ingredients (water and egg) into the bread pan of the machine.
2. Then add all the dry ingredients EXCEPT yeast.
3. Make a small well on the top of the dry ingredients (not too deep to keep yeast away from the wet ingredients), add the yeast to the well.
4. Select the DOUGH function and press start.
5. My bread maker takes - 5 minutes for first knead (mixing) and 15 minutes for the whole kneading process.
6. I added the butter after the first knead.
7. Straight I let the dough to proof 2 hour inside the breadmaker
8. The dough should be triple in size after 2.5 hours.
9. Punch the dough with your fist to deflate the gas.
10. Divide the dough to 60g balls and filled them with the peanut paste.

Let it rise for another 50 minutes, cover with plastic film. *(I put the ready buns 15 mins under the heat of hot sun for better proofing) 15 minutes before rising time up, pre-heat the oven at 350
Place the almond slices on top of the buns. Brush the egg & milk mixture liquid and bake it for 13 minutes.
Remove the buns from the oven, lightly brush with butter for shinny effect (optional)
Temperature and time are to be adjusted as different oven will bring different condition and result.

AMY

LinkWithin

Related Posts Widget for Blogs by LinkWithin